What you’ll build
An end-to-end voice integration where your Vapi AI assistant can place outbound calls through Vobiz SIP trunking and answer inbound calls placed to your Vobiz number.Prerequisites
- Vobiz account with a SIP trunk → Create account
- Vapi account → Sign up
- Vapi assistant created → Create in dashboard
- Phone number from Vobiz (for caller ID)
Outbound calls
Step 1: Create SIP trunk credentials in Vapi
Open Vapi integrations
Log in to the Vapi Dashboard, click Integrations in the sidebar, then navigate to SIP Trunk Credentials.
Add gateway URL
Enter your Vobiz SIP domain from the Vobiz Console (for example,
bfab10fb.sip.vobiz.ai).
| Field | Example value |
|---|---|
| Gateway URL (SIP Domain) | <your_unique_domain>.sip.vobiz.ai |
| Username | <your_username> |
| Password | <your_password> |
Step 2: Get Vobiz SIP credentials
From the Vobiz Console:
- Log in to the Vobiz Console.
- Go to SIP Trunk → Outbound Trunks → Trunks.
- Select your trunk.
- Scroll down to the Authentication & Linking section.
- Copy the SIP Domain, Username, and Password.
Don’t have a Vobiz trunk yet? See the SIP trunks documentation to create one.
Step 3: Import your phone number
Need a phone number? See the phone numbers documentation to purchase one from Vobiz.
Step 4: Make an outbound call
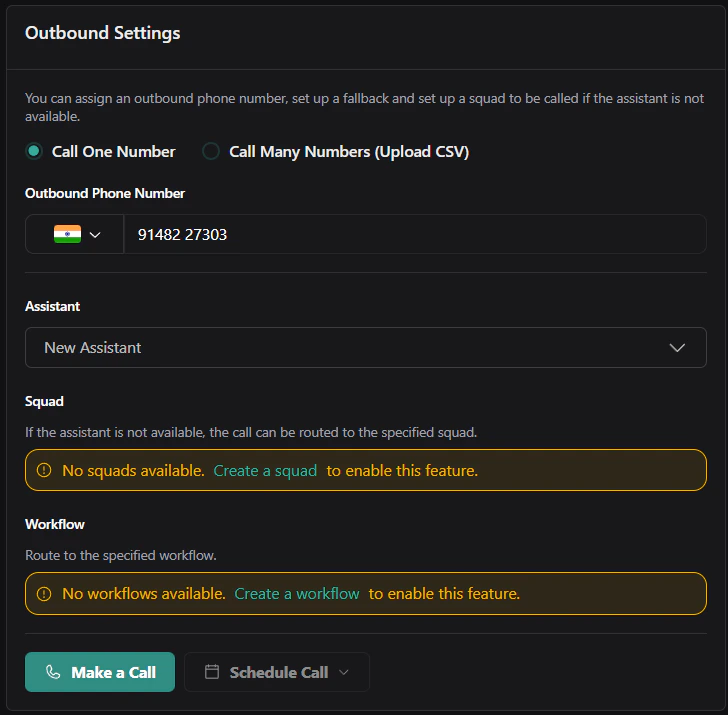
Configure outbound settings
Open Outbound Settings, enter the destination number (for example,
+919148223344), select your assistant, and select your imported Vobiz number as the caller ID.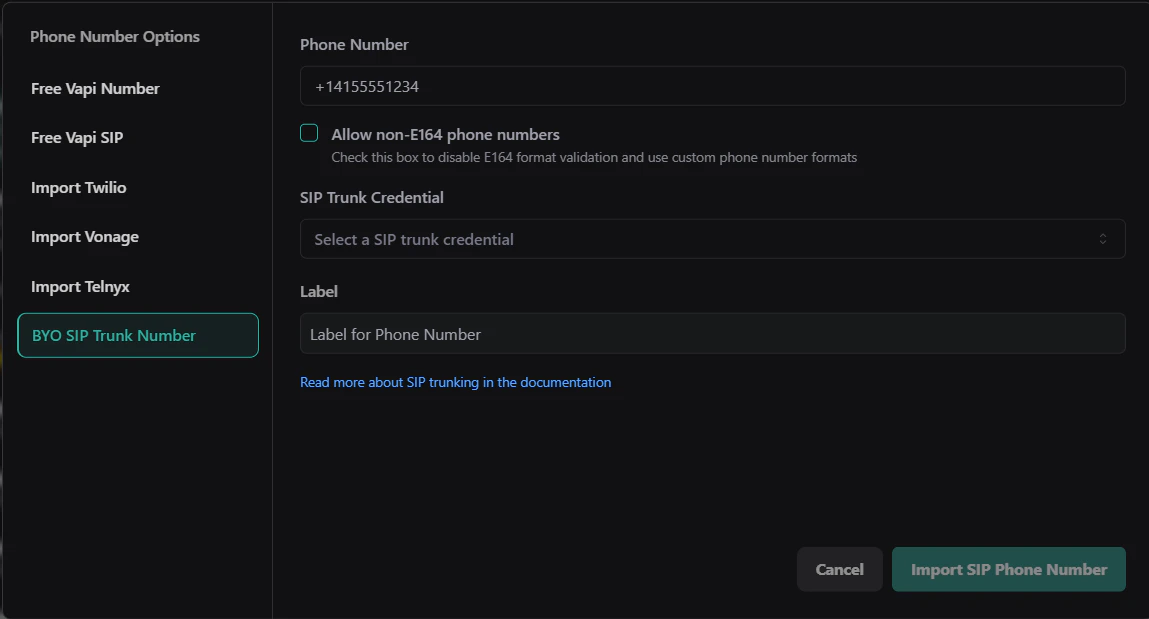
Outbound integration complete! Your Vapi assistant can now make outbound calls through Vobiz SIP infrastructure.
Step 5: Configure call transfer (optional)
To let the AI agent hand a call off to a human, add a Transfer Call tool and give it a destination. You can transfer to a plain phone number, or - to route the transfer out through your Vobiz trunk - to a SIP destination.
Create the transfer tool
In the Vapi Dashboard, open Tools, click Create Tool, and select Transfer Call (
transferCall). Attach the tool to your assistant.Add a destination
In the tool’s Destinations section, click Add Destination and choose SIP (or Phone Number for a simple PSTN transfer).
Set the SIP URI
For a SIP destination, set the SIP URI to the destination number at your Vobiz trunk domain:Replace
+91XXXXXXXXXX with the E.164 number to transfer to, and <your-trunk> with your Vobiz SIP domain - for example sip:+919876543210@abc123.sip.vobiz.ai.| Destination type | When to use | Value |
|---|---|---|
| SIP | Route the transfer through your Vobiz trunk | sip:+91XXXXXXXXXX@<your-trunk>.sip.vobiz.ai |
| Phone Number | Simple blind transfer to a PSTN number | E.164, e.g. +919876543210 |
The SIP destination sends the transferred leg to
<your-trunk>.sip.vobiz.ai, so it’s carried over your Vobiz SIP trunking - the same domain you use for your other Vobiz trunks. Get your SIP domain from Vobiz Console → SIP Trunk → your trunk → Authentication & Linking.Inbound calls
Receive calls placed to your Vobiz number and route them to your Vapi AI assistant.Step 1: Create an inbound SIP trunk in Vapi
Vobiz sends inbound SIP from any of its signaling IPs, so you must add every Vobiz SIP signaling IP as a gateway. If you whitelist only one, calls that arrive from a different Vobiz IP are rejected.
Open SIP trunk settings
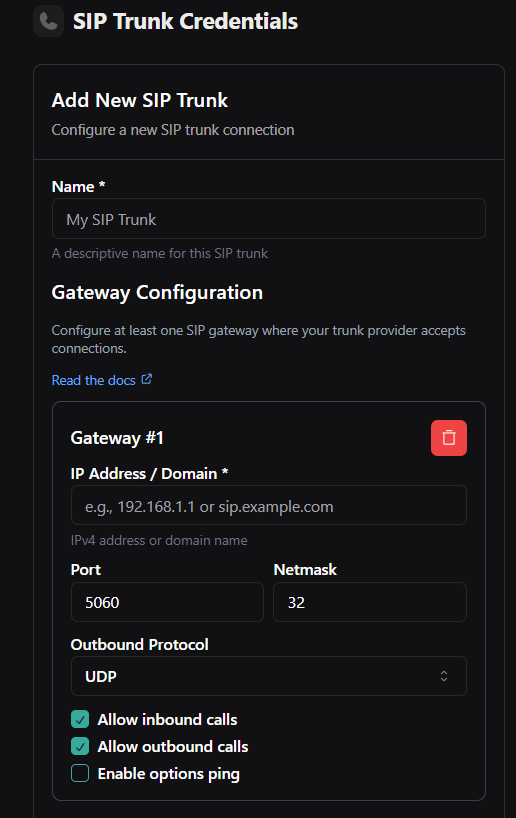
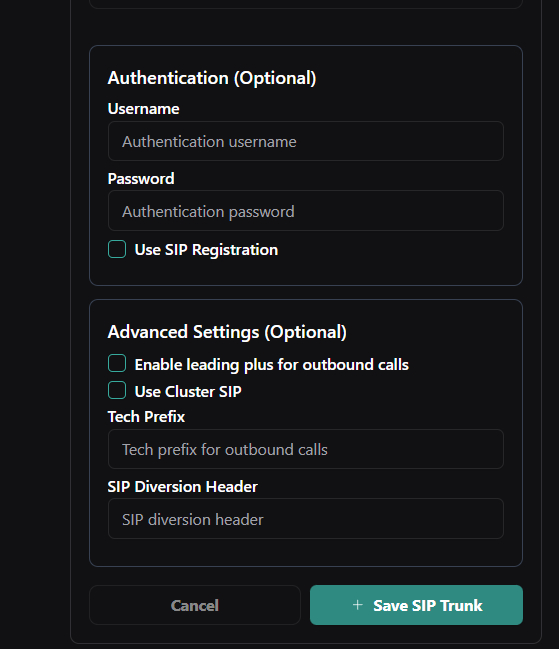
In the Vapi Dashboard, click More → Integrations in the sidebar, then navigate to SIP Trunk and click Create New SIP Trunk. Name it (for example,
Vobiz Inbound Trunk).Configure Gateway #1
In Gateway #1, set IP Address / Domain to the first Vobiz SIP signaling IP, Port
5060, Netmask 32, and Outbound Protocol UDP. Check Allow inbound calls; leave Allow outbound calls and Enable options ping unchecked.Add a gateway for every Vobiz SIP signaling IP
Click Add Another Gateway and repeat the same settings (Port
5060, Netmask 32, UDP, Allow inbound calls) for each remaining Vobiz SIP signaling IP - so all of them are whitelisted.| Setting | Value |
|---|---|
| Port | 5060 |
| Netmask | 32 |
| Outbound Protocol | UDP |
| Allow inbound calls | Enabled |
| Allow outbound calls | Disabled |
| Enable options ping | Disabled |
Vobiz SIP signaling IPs
Step 2: Get the Vapi trunk ID
After saving the trunk in Vapi, you need the Trunk ID to configure Vobiz. The Trunk ID is only available via the Vapi API.
id field - this is your Trunk ID. Find the entry whose name matches your inbound trunk; its gateways array should list every Vobiz SIP signaling IP you added, each with outboundEnabled: false.
Step 3: Create an inbound trunk in the Vobiz Console
Open inbound trunks
Log in to the Vobiz Console and go to SIP Trunks → Inbound Trunk.
Create the trunk
Click Create New Trunk, name it (for example,
Vapi Inbound), and set Transport to UDP.Set the primary URI
Set Primary URI to
<VAPI_TRUNK_ID>.sip.vapi.ai - for example, 46deea29-645d-44a3-bf42-7c6ec2d4b65c.sip.vapi.ai.Step 4: Import the phone number in Vapi
- In the Vapi Dashboard, go to Phone Numbers in the sidebar.
- Click Create Phone Number.
- Select BYO SIP Trunk Number.
- Enter your Vobiz phone number (for example,
+918071387376). - In SIP Trunk Credential, select the inbound trunk you created in Step 1.
- Label it (for example,
Vobiz Inbound Line) and click Import SIP Phone Number.
Step 5: Assign assistant and test
- On the phone number you just imported, scroll to Inbound Settings.
- Under Select Assistant, choose your Vapi AI assistant.
- Click Save.
- Test it - dial your Vobiz number from any phone. Your AI assistant should answer.
Inbound setup complete! Calls to your Vobiz number now route to your Vapi AI assistant automatically.
Troubleshooting
Call doesn’t connect
- Verify SIP domain, username, and password are correct in the Vobiz Console.
- Use the exact
sip_domain(for example,bfab10fb.sip.vobiz.ai), not a genericsip.vobiz.ai.
Assistant doesn’t speak
- Verify the assistant has a First Message configured.
- Check the assistant has a voice provider set up correctly.
- View call logs in the Vapi Dashboard → Calls for errors.
Phone number format error
- Use E.164 format:
+919148223344(with+). - Or local format:
09148223344(without+). - Verify the number is active in the Vobiz Console.
Next steps
- Customize your assistant - configure voice, personality, and responses in the Vapi Dashboard.
- View call analytics - monitor call logs, transcripts, and metrics in Vapi Dashboard → Calls.
- Automate with API - see the Vapi API setup guide to trigger calls programmatically.
- Monitor usage - track your Vobiz balance and call records.