` |
Step 2: Get Vobiz SIP credentials
From the Vobiz Console:
1. Log in to the [Vobiz Console](https://console.vobiz.ai).
2. Go to **SIP Trunk** → **Outbound Trunks** → **Trunks**.
3. Select your trunk.
4. Scroll down to the **Authentication & Linking** section.
5. Copy the **SIP Domain**, **Username**, and **Password**.
 Don't have a Vobiz trunk yet? See the [SIP trunks documentation](/trunks) to create one.
Step 3: Import your phone number
In the Vapi Dashboard, go to **Phone Numbers** and click **Add Number**.
Select **BYO SIP Trunk Number**.
Enter your Vobiz number (for example, `08071387149`).
Under **SIP Trunk Credentials**, pick the credential you created in Step 1, label it (for example, `Vobiz Main Line`), and click **Import SIP Trunk Number**.
 Need a phone number? See the [phone numbers documentation](/account-phone-number/list-inventory-numbers) to purchase one from Vobiz.
Step 4: Make an outbound call
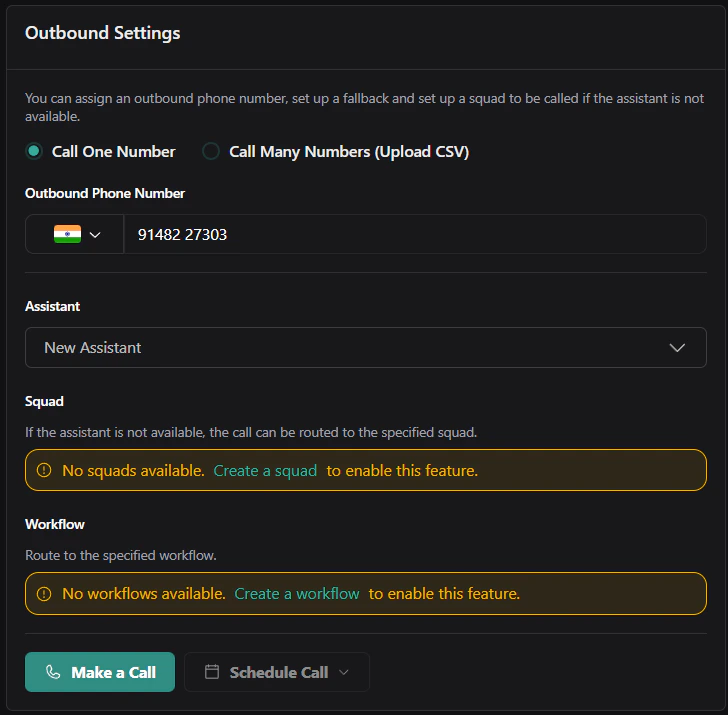
In the Vapi Dashboard, click **Make a Call** or go to **Phone Calls** → **New Call**.
Open **Outbound Settings**, enter the destination number (for example, `+919148223344`), select your assistant, and select your imported Vobiz number as the caller ID.
Click **Make Outbound Call**. The call will initiate and your Vapi assistant will speak when the recipient answers.
 **Outbound integration complete!** Your Vapi assistant can now make outbound calls through Vobiz SIP infrastructure.
Step 5: Configure call transfer (optional)
To let the AI agent hand a call off to a human, add a **Transfer Call** tool and give it a destination. You can transfer to a plain **phone number**, or - to route the transfer out through your Vobiz trunk - to a **SIP** destination.
In the Vapi Dashboard, open **Tools**, click **Create Tool**, and select **Transfer Call** (`transferCall`). Attach the tool to your assistant.
In the tool's **Destinations** section, click **Add Destination** and choose **SIP** (or **Phone Number** for a simple PSTN transfer).
For a **SIP** destination, set the **SIP URI** to the destination number at your Vobiz trunk domain:
```text theme={null}
sip:+91XXXXXXXXXX@.sip.vobiz.ai
```
Replace `+91XXXXXXXXXX` with the E.164 number to transfer to, and `` with your Vobiz SIP domain - for example `sip:+919876543210@abc123.sip.vobiz.ai`.
Optionally add a **Message to Customer** (played before the transfer connects), then save.
| Destination type | When to use | Value |
| ---------------- | ------------------------------------------- | --------------------------------------------- |
| **SIP** | Route the transfer through your Vobiz trunk | `sip:+91XXXXXXXXXX@.sip.vobiz.ai` |
| **Phone Number** | Simple blind transfer to a PSTN number | E.164, e.g. `+919876543210` |
 The SIP destination sends the transferred leg to `.sip.vobiz.ai`, so it's carried over your Vobiz SIP trunking - the same domain you use for your other Vobiz trunks. Get your SIP domain from **Vobiz Console** → **SIP Trunk** → your trunk → **Authentication & Linking**.
## Inbound calls
Receive calls placed to your Vobiz number and route them to your Vapi AI assistant.
```text theme={null}
Caller dials Vobiz number → Vobiz SIP → Vapi SIP trunk → Vapi AI assistant
```
The SIP destination sends the transferred leg to `.sip.vobiz.ai`, so it's carried over your Vobiz SIP trunking - the same domain you use for your other Vobiz trunks. Get your SIP domain from **Vobiz Console** → **SIP Trunk** → your trunk → **Authentication & Linking**.
## Inbound calls
Receive calls placed to your Vobiz number and route them to your Vapi AI assistant.
```text theme={null}
Caller dials Vobiz number → Vobiz SIP → Vapi SIP trunk → Vapi AI assistant
```
Step 1: Create an inbound SIP trunk in Vapi
Vobiz sends inbound SIP from **any** of its signaling IPs, so you must add **every** Vobiz SIP signaling IP as a gateway. If you whitelist only one, calls that arrive from a different Vobiz IP are rejected.
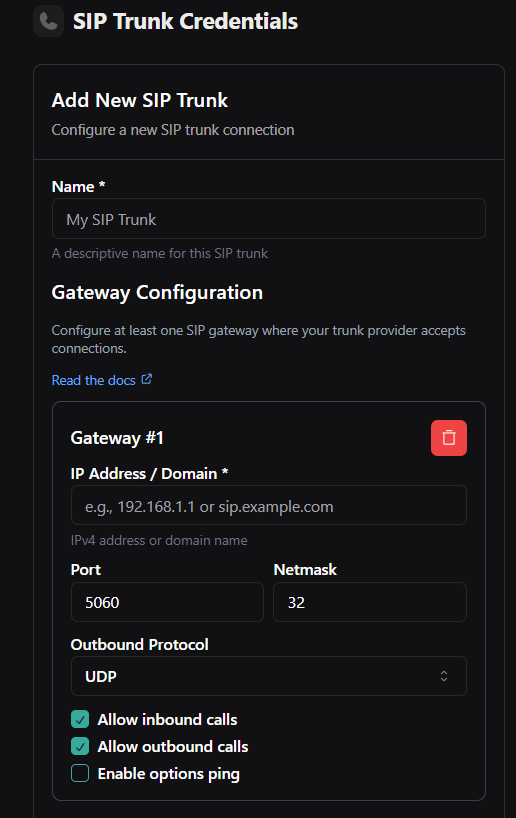
In the [Vapi Dashboard](https://dashboard.vapi.ai), click **More** → **Integrations** in the sidebar, then navigate to **SIP Trunk** and click **Create New SIP Trunk**. Name it (for example, `Vobiz Inbound Trunk`).
In **Gateway #1**, set **IP Address / Domain** to the first Vobiz SIP signaling IP, **Port** `5060`, **Netmask** `32`, and **Outbound Protocol** `UDP`. Check **Allow inbound calls**; leave **Allow outbound calls** and **Enable options ping** unchecked.
Click **Add Another Gateway** and repeat the same settings (Port `5060`, Netmask `32`, UDP, **Allow inbound calls**) for each remaining Vobiz SIP signaling IP - so all of them are whitelisted.
Click **Save**. You should end up with one gateway per Vobiz SIP signaling IP (10 at the time of writing), each shown as `udp · inbound`.
Use these settings for **every** gateway:
| Setting | Value |
| -------------------- | -------- |
| Port | `5060` |
| Netmask | `32` |
| Outbound Protocol | `UDP` |
| Allow inbound calls | Enabled |
| Allow outbound calls | Disabled |
| Enable options ping | Disabled |
Add one gateway for each **Vobiz SIP signaling IP**:
```text Vobiz SIP signaling IPs theme={null}
13.203.7.132
65.2.100.211
13.126.98.234
13.235.11.131
13.233.44.61
3.111.255.163
3.111.128.110
43.204.64.203
15.207.232.91
35.154.133.28
```
These IPs can change. Always confirm the current list on [IP whitelisting → SIP signaling](/concepts/ip-whitelisting#sip-signaling) and keep your Vapi gateways in sync.
**Want outbound on the same trunk?** Add another gateway with your Vobiz SIP domain and credentials and enable **Allow outbound calls** - or use the dedicated outbound credential from the [Outbound calls](#outbound-calls) section above.
Step 2: Get the Vapi trunk ID
After saving the trunk in Vapi, you need the **Trunk ID** to configure Vobiz. The Trunk ID is only available via the Vapi API.
```bash theme={null}
curl -X GET "https://api.vapi.ai/credential" \
-H "Authorization: Bearer YOUR_VAPI_API_KEY"
```
Find the trunk in the response that matches your inbound trunk name:
```json theme={null}
{
"id": "46deea29-645d-44a3-bf42-7c6ec2d4b65c",
"orgId": "0c147555-d9bc-41ff-8c89-82eca29f891c",
"provider": "byo-sip-trunk",
"gateways": [
{ "ip": "13.203.7.132", "outboundEnabled": false },
{ "ip": "65.2.100.211", "outboundEnabled": false },
{ "ip": "13.126.98.234", "outboundEnabled": false }
// ... one entry per Vobiz SIP signaling IP
],
"name": "Vobiz Inbound Trunk"
}
```
Copy the `id` field - this is your **Trunk ID**. Find the entry whose `name` matches your inbound trunk; its `gateways` array should list every Vobiz SIP signaling IP you added, each with `outboundEnabled: false`.
Step 3: Create an inbound trunk in the Vobiz Console
Log in to the [Vobiz Console](https://console.vobiz.ai) and go to **SIP Trunks** → **Inbound Trunk**.
Click **Create New Trunk**, name it (for example, `Vapi Inbound`), and set **Transport** to `UDP`.
Set **Primary URI** to `.sip.vapi.ai` - for example, `46deea29-645d-44a3-bf42-7c6ec2d4b65c.sip.vapi.ai`.
Link your Vobiz phone number to this trunk and click **Save**.
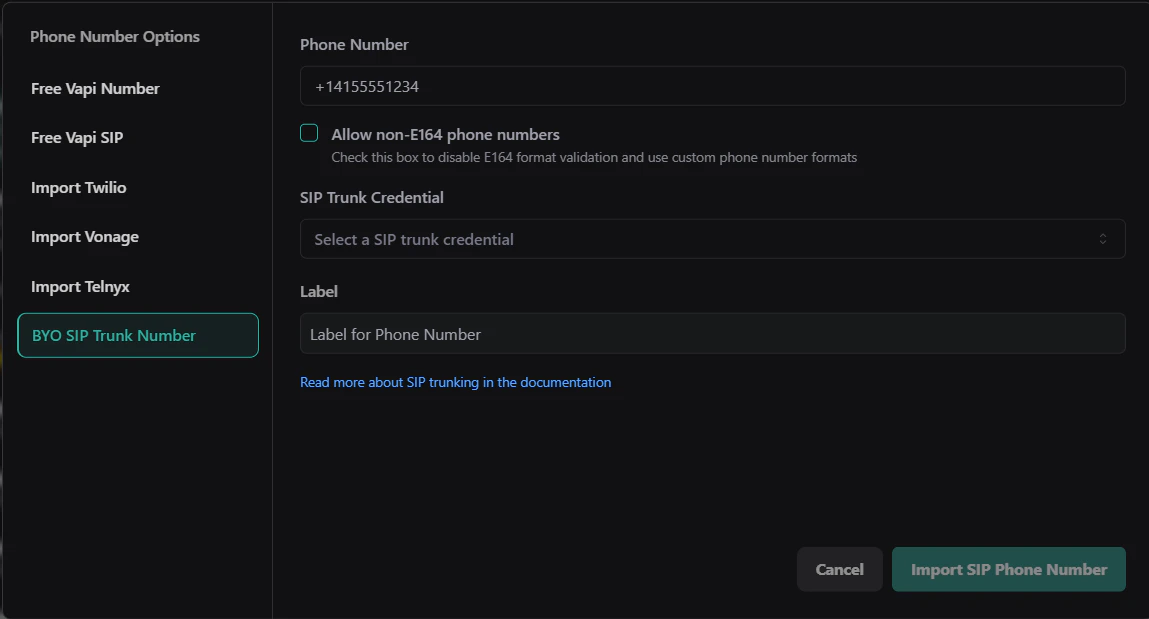
Step 4: Import the phone number in Vapi
1. In the [Vapi Dashboard](https://dashboard.vapi.ai), go to **Phone Numbers** in the sidebar.
2. Click **Create Phone Number**.
3. Select **BYO SIP Trunk Number**.
4. Enter your Vobiz phone number (for example, `+918071387376`).
5. In **SIP Trunk Credential**, select the inbound trunk you created in Step 1.
6. Label it (for example, `Vobiz Inbound Line`) and click **Import SIP Phone Number**.
Step 5: Assign assistant and test
1. On the phone number you just imported, scroll to **Inbound Settings**.
2. Under **Select Assistant**, choose your Vapi AI assistant.
3. Click **Save**.
4. **Test it** - dial your Vobiz number from any phone. Your AI assistant should answer.
**Inbound setup complete!** Calls to your Vobiz number now route to your Vapi AI assistant automatically.
## Troubleshooting
Call doesn't connect
* Verify SIP domain, username, and password are correct in the [Vobiz Console](https://console.vobiz.ai).
* Use the exact `sip_domain` (for example, `bfab10fb.sip.vobiz.ai`), not a generic `sip.vobiz.ai`.
Assistant doesn't speak
* Verify the assistant has a **First Message** configured.
* Check the assistant has a voice provider set up correctly.
* View call logs in the [Vapi Dashboard](https://dashboard.vapi.ai) → **Calls** for errors.
Phone number format error
* Use E.164 format: `+919148223344` (with `+`).
* Or local format: `09148223344` (without `+`).
* Verify the number is active in the [Vobiz Console](https://console.vobiz.ai).
Need more detail? See the [API troubleshooting guide](/integrations/vapi-api#troubleshooting) for additional error scenarios.
## Next steps
* **Customize your assistant** - configure voice, personality, and responses in the [Vapi Dashboard](https://dashboard.vapi.ai).
* **View call analytics** - monitor call logs, transcripts, and metrics in **Vapi Dashboard** → **Calls**.
* **Automate with API** - see the [Vapi API setup guide](/integrations/vapi-api) to trigger calls programmatically.
* **Monitor usage** - track your Vobiz balance and call records.
 Copy your unique credentials from the **Authentication & Linking** section of your trunk:
| Field | Example value |
| ------------------------ | ----------------------------------- |
| Gateway URL (SIP Domain) | `
Copy your unique credentials from the **Authentication & Linking** section of your trunk:
| Field | Example value |
| ------------------------ | ----------------------------------- |
| Gateway URL (SIP Domain) | `