> ## Documentation Index
> Fetch the complete documentation index at: https://docs.vobiz.ai/llms.txt
> Use this file to discover all available pages before exploring further.

# LiveKit integration

> LiveKit connects to Vobiz SIP trunking for real-time AI voice agents - inbound and outbound calling across 130+ countries with dispatch rules and trunk setup.

<iframe width="100%" height="420" src="https://www.youtube.com/embed/SsutaAit-_M" title="LiveKit + Vobiz Integration Tutorial" frameBorder="0" allow="accelerometer; autoplay; clipboard-write; encrypted-media; gyroscope; picture-in-picture" allowFullScreen style={{ borderRadius: "12px", marginTop: "1rem", marginBottom: "1rem" }} />

## Overview

<div className="grid grid-cols-1 md:grid-cols-3 gap-4 my-6">
  <div className="flex flex-col items-center justify-center p-6 border border-gray-200 rounded-xl shadow-sm text-center bg-white">
    <div className="w-12 h-12 rounded-full bg-blue-100 text-blue-600 flex items-center justify-center mb-4">
      <svg className="w-6 h-6" fill="none" stroke="currentColor" viewBox="0 0 24 24">
        <path strokeLinecap="round" strokeLinejoin="round" strokeWidth="2" d="M12 8v4l3 3m6-3a9 9 0 11-18 0 9 9 0 0118 0z" />
      </svg>
    </div>

    <div className="font-bold text-gray-900 mb-1">Time to complete</div>
    <div className="text-gray-500 text-sm">\~15 minutes</div>
  </div>

  <div className="flex flex-col items-center justify-center p-6 border border-gray-200 rounded-xl shadow-sm text-center bg-white">
    <div className="w-12 h-12 rounded-full bg-green-100 text-green-600 flex items-center justify-center mb-4">
      <svg className="w-6 h-6" fill="none" stroke="currentColor" viewBox="0 0 24 24">
        <path strokeLinecap="round" strokeLinejoin="round" strokeWidth="2" d="M14 10h4.764a2 2 0 011.789 2.894l-3.5 7A2 2 0 0115.263 21h-4.017c-.163 0-.326-.02-.485-.06L7 20m7-10V5a2 2 0 00-2-2h-.095c-.5 0-.905.405-.905.905 0 .714-.211 1.412-.608 2.006L7 11v9m7-10h-2M7 20H5a2 2 0 01-2-2v-6a2 2 0 012-2h2.514" />
      </svg>
    </div>

    <div className="font-bold text-gray-900 mb-1">Difficulty</div>
    <div className="text-gray-500 text-sm">Beginner-Friendly (No Code)</div>
  </div>

  <div className="flex flex-col items-center justify-center p-6 border border-gray-200 rounded-xl shadow-sm text-center bg-white">
    <div className="w-12 h-12 rounded-full bg-purple-100 text-purple-600 flex items-center justify-center mb-4">
      <svg className="w-6 h-6" fill="none" stroke="currentColor" viewBox="0 0 24 24">
        <path strokeLinecap="round" strokeLinejoin="round" strokeWidth="2" d="M13 10V3L4 14h7v7l9-11h-7z" />
      </svg>
    </div>

    <div className="font-bold text-gray-900 mb-1">Goal</div>
    <div className="text-gray-500 text-sm">Connect AI to a real phone</div>
  </div>
</div>

This guide shows how to integrate LiveKit with Vobiz to enable **outbound calling** and **inbound answering** for your AI agents.

<div className="border border-slate-200 bg-slate-50 rounded-xl p-6 my-8">
  <div className="font-bold text-slate-800 mb-4">Integration flow:</div>

  <div className="flex flex-col gap-4">
    <div className="flex items-center gap-4">
      <div className="bg-green-100 text-green-700 font-bold text-xs px-3 py-1.5 rounded border border-green-200 tracking-wider w-24 text-center">
        OUTBOUND
      </div>

      <div className="flex-1 bg-white border border-slate-200 rounded-lg p-4 flex flex-wrap items-center gap-3">
        <div className="bg-orange-50 border border-orange-200 text-orange-800 px-3 py-1 rounded text-sm font-medium">Your App</div>
        <div className="text-slate-400">→</div>
        <div className="bg-orange-50 border border-orange-200 text-orange-800 px-3 py-1 rounded text-sm font-medium">LiveKit</div>
        <div className="text-slate-400">→</div>
        <div className="bg-orange-50 border border-orange-200 text-orange-800 px-3 py-1 rounded text-sm font-medium">Vobiz</div>
        <div className="text-slate-400">→</div>
        <div className="bg-orange-50 border border-orange-200 text-orange-800 px-3 py-1 rounded text-sm font-medium">Phone Network</div>
      </div>
    </div>

    <div className="flex items-center gap-4">
      <div className="bg-blue-100 text-blue-700 font-bold text-xs px-3 py-1.5 rounded border border-blue-200 tracking-wider w-24 text-center">
        INBOUND
      </div>

      <div className="flex-1 bg-white border border-slate-200 rounded-lg p-4 flex flex-wrap items-center gap-3">
        <div className="bg-orange-50 border border-orange-200 text-orange-800 px-3 py-1 rounded text-sm font-medium">Phone Network</div>
        <div className="text-slate-400">→</div>
        <div className="bg-orange-50 border border-orange-200 text-orange-800 px-3 py-1 rounded text-sm font-medium">Vobiz</div>
        <div className="text-slate-400">→</div>
        <div className="bg-orange-50 border border-orange-200 text-orange-800 px-3 py-1 rounded text-sm font-medium">LiveKit</div>
        <div className="text-slate-400">→</div>
        <div className="bg-orange-50 border border-orange-200 text-orange-800 px-3 py-1 rounded text-sm font-medium">AI Agent</div>
      </div>
    </div>
  </div>
</div>

## Prerequisites

Before you start:

<div className="border border-gray-200 dark:border-gray-800 rounded-xl p-6 mt-4 mb-8">
  <div className="flex flex-col gap-5">
    <div className="flex items-center gap-3">
      <div className="w-5 h-5 rounded bg-[#4ade80] flex items-center justify-center text-white shrink-0">
        <svg className="w-3.5 h-3.5" fill="none" stroke="currentColor" viewBox="0 0 24 24">
          <path strokeLinecap="round" strokeLinejoin="round" strokeWidth="4" d="M5 13l4 4L19 7" />
        </svg>
      </div>

      <div className="text-gray-800 dark:text-gray-200 text-[15px]">**Vobiz Account** with active balance → <a href="https://console.vobiz.ai/signup" className="text-primary hover:underline">Create account</a></div>
    </div>

    <div className="flex items-center gap-3">
      <div className="w-5 h-5 rounded bg-[#4ade80] flex items-center justify-center text-white shrink-0">
        <svg className="w-3.5 h-3.5" fill="none" stroke="currentColor" viewBox="0 0 24 24">
          <path strokeLinecap="round" strokeLinejoin="round" strokeWidth="4" d="M5 13l4 4L19 7" />
        </svg>
      </div>

      <div className="text-gray-800 dark:text-gray-200 text-[15px]">**LiveKit Account** with project → <a href="https://cloud.livekit.io" className="text-primary hover:underline">Sign up</a></div>
    </div>

    <div className="flex items-center gap-3">
      <div className="w-5 h-5 rounded bg-[#4ade80] flex items-center justify-center text-white shrink-0">
        <svg className="w-3.5 h-3.5" fill="none" stroke="currentColor" viewBox="0 0 24 24">
          <path strokeLinecap="round" strokeLinejoin="round" strokeWidth="4" d="M5 13l4 4L19 7" />
        </svg>
      </div>

      <div className="text-gray-800 dark:text-gray-200 text-[15px]">**LiveKit AI Agent** built → <a href="https://docs.livekit.io/agents" className="text-primary hover:underline">LiveKit Agents docs</a></div>
    </div>
  </div>
</div>

## Part 1: Vobiz setup

<div className="text-xl font-bold mt-8 mb-4 text-slate-800 dark:text-slate-200">Create a SIP trunk</div>

<img className="block w-full rounded-xl border border-gray-200 my-4 shadow-sm" src="https://mintcdn.com/vobizai/OZ7y9Kg025aXyvCH/images/console-new-ui/create-trunk-1.png?fit=max&auto=format&n=OZ7y9Kg025aXyvCH&q=85&s=1006cb5a3a7f0e70da03cc4f1d63b94d" alt="SIP Trunk Overview" width="2940" height="1122" data-path="images/console-new-ui/create-trunk-1.png" />

1. Log in to the <a href="https://console.vobiz.ai" className="text-primary font-medium hover:underline">Vobiz Console</a>

2. In the left sidebar, navigate to **SIP Trunk > Outbound Trunks > Trunks**

3. Click **+ Create Trunk**

4. Enter a **Trunk Name** (for example, "LiveKit Integration") and an optional **Description**

5. Under Authentication & Linking, select a Credential from the **Credentials List** (or click **+ Create New Credential** if you don't have one)

6. Click **+ Create Trunk** at the bottom right to save

<img className="block w-full rounded-xl border border-gray-200 mt-4 shadow-sm" src="https://mintcdn.com/vobizai/OZ7y9Kg025aXyvCH/images/console-new-ui/create-trunk-2.png?fit=max&auto=format&n=OZ7y9Kg025aXyvCH&q=85&s=e9358157b58810712f69d92c53e30498" alt="Trunk Details" width="2880" height="1474" data-path="images/console-new-ui/create-trunk-2.png" />

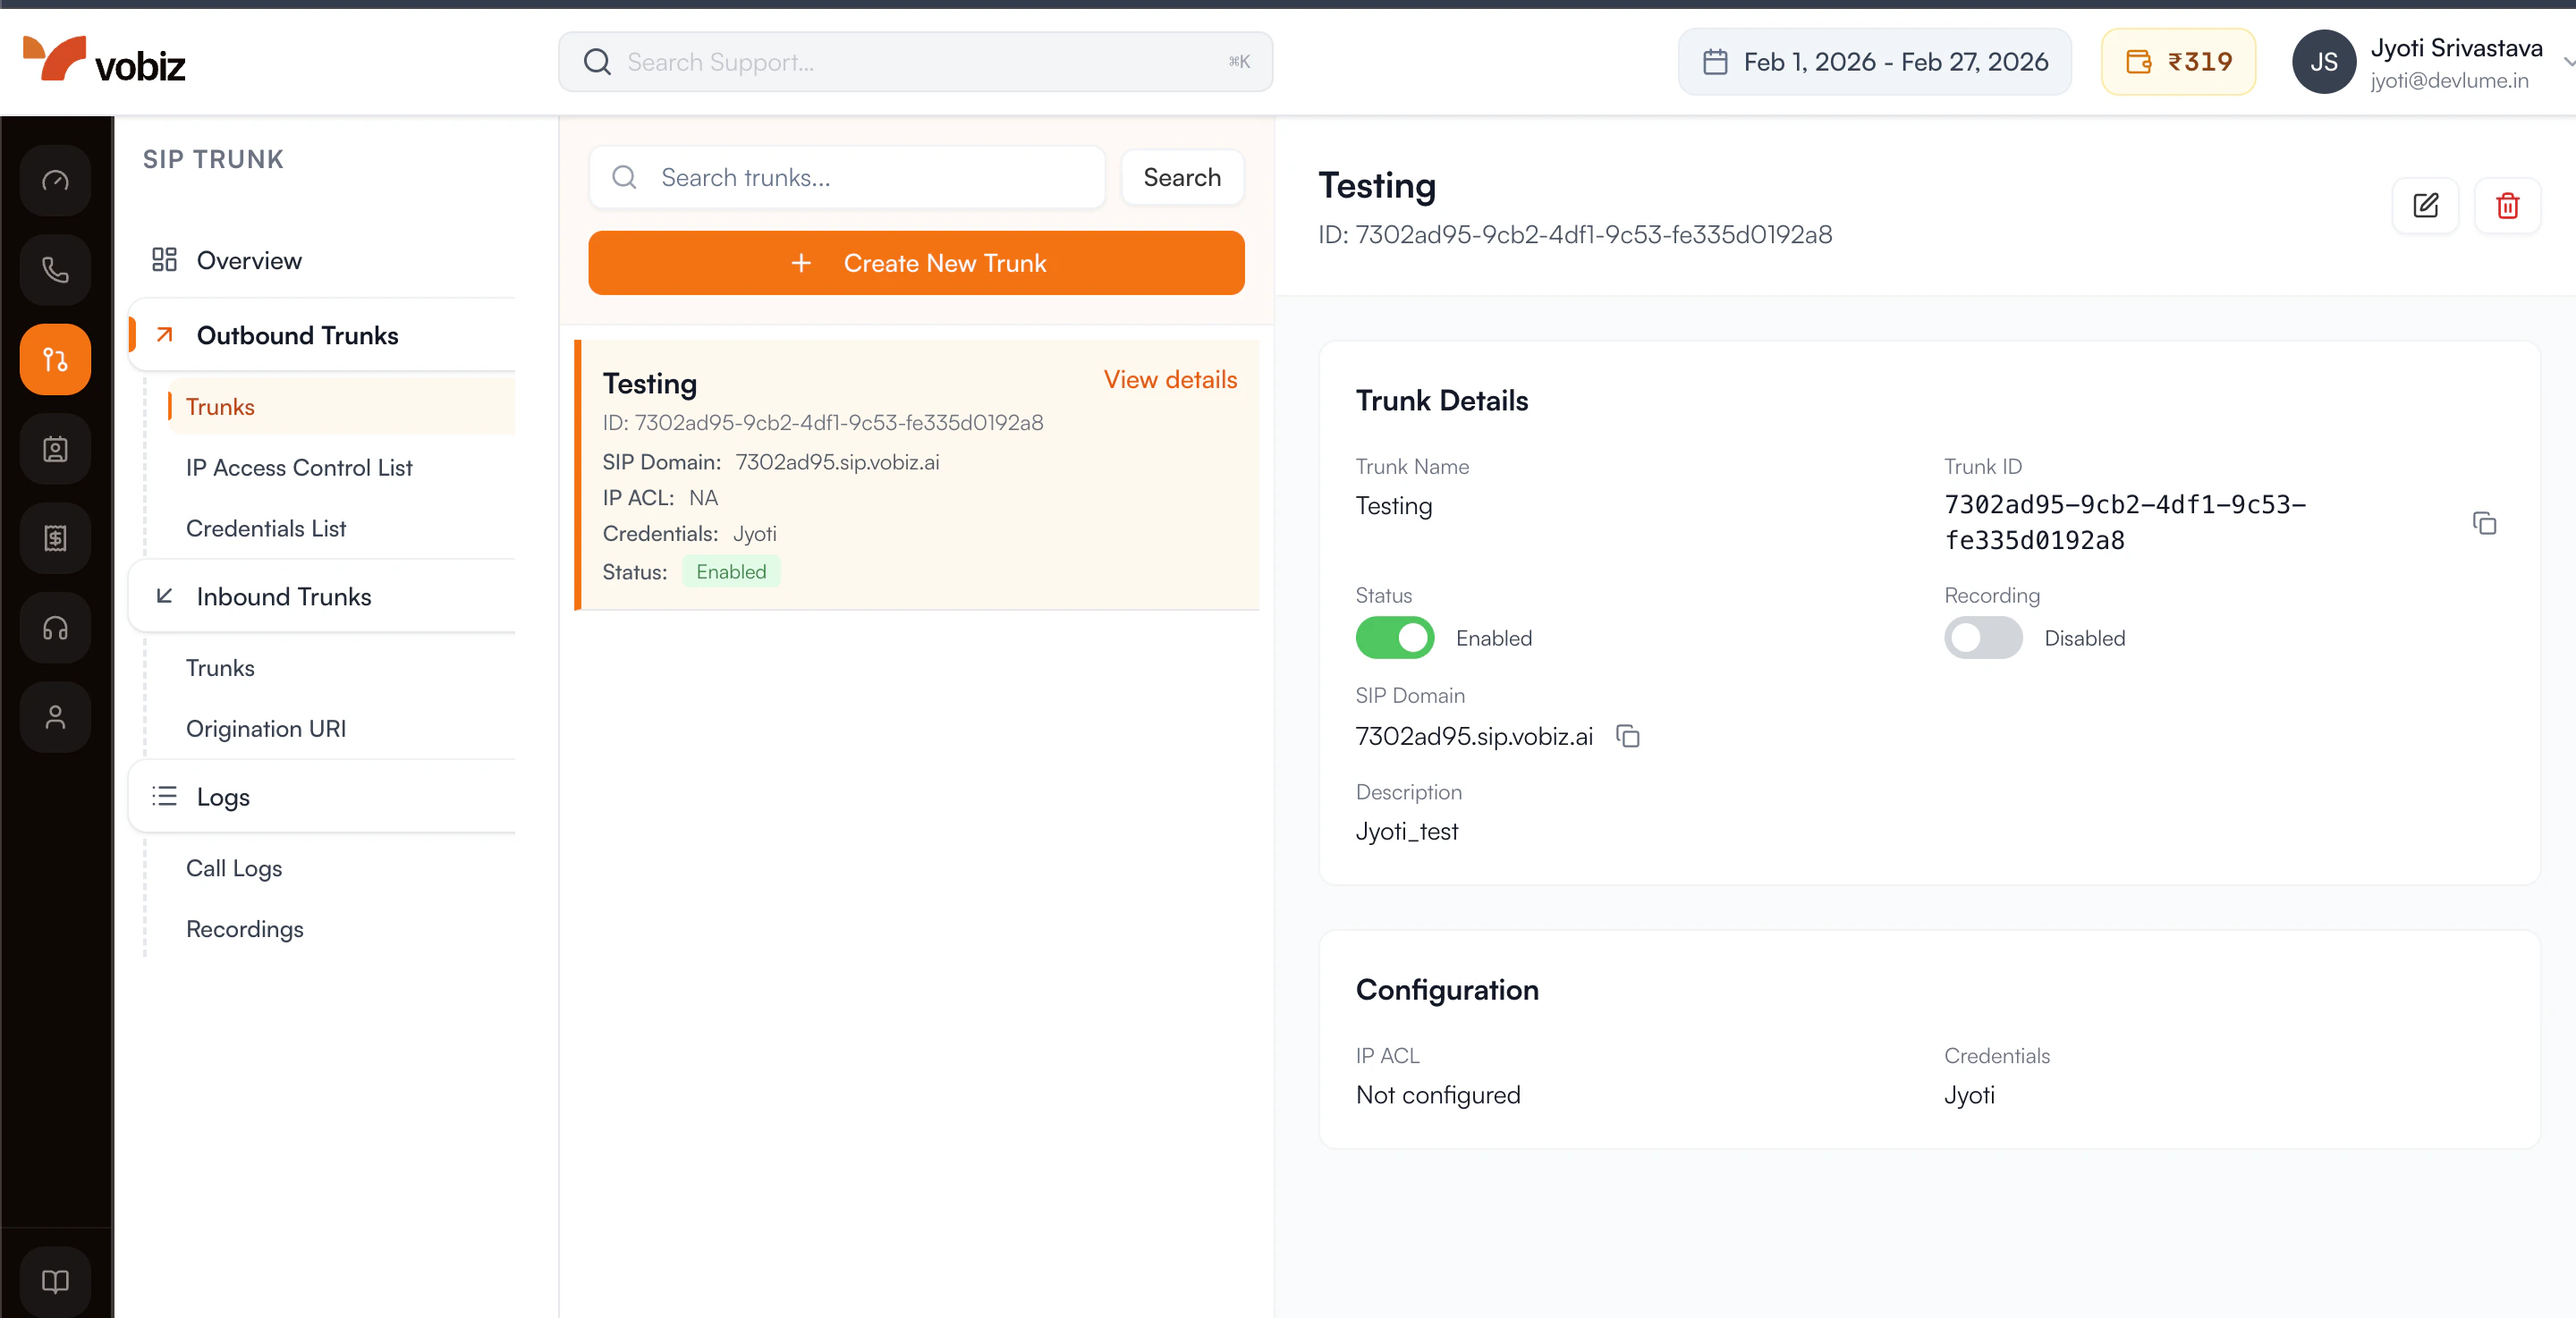
After creating the trunk, copy your credentials from the **Authentication & Linking** section:

| Field                    | Value                               |
| ------------------------ | ----------------------------------- |
| SIP Domain (Gateway URL) | `<your_unique_domain>.sip.vobiz.ai` |
| Username                 | `<your_username>`                   |
| Password                 | `<your_password>`                   |

<Check>
  You now have a dedicated bridge ready for voice traffic.
</Check>

<Tip>
  Keep these handy - you'll paste them into your LiveKit code in Part 3.
</Tip>

<div className="text-xl font-bold mt-8 mb-4 text-slate-800 dark:text-slate-200">Get a phone number</div>

Purchase a phone number for outbound caller ID or inbound calls. See [phone numbers](/account-phone-number).

## Part 2: LiveKit setup

<div className="text-xl font-bold mt-8 mb-4 text-slate-800 dark:text-slate-200">Get LiveKit credentials</div>

1. Go to the <a href="https://cloud.livekit.io" className="text-primary font-medium hover:underline">LiveKit Cloud Dashboard</a> and select your project.

2. Go to **Settings > API Keys**.

3. You need these three values:

   | Variable             | Where to find       |
   | -------------------- | ------------------- |
   | `LIVEKIT_URL`        | Settings > General  |
   | `LIVEKIT_API_KEY`    | Settings > API Keys |
   | `LIVEKIT_API_SECRET` | Settings > API Keys |

```bash .env theme={null}
LIVEKIT_URL=wss://your-project.livekit.cloud
LIVEKIT_API_KEY=APIxxxxxxxxxxxxx
LIVEKIT_API_SECRET=secretxxxxxxxxxx
```

## Part 3: Connect LiveKit to Vobiz (outbound)

<Note>
  For a complete working example, see the [LiveKit Vobiz Outbound Repository](https://github.com/vobiz-ai/LiveKit-Vobiz-Outbound).
</Note>

<div className="text-xl font-bold mt-8 mb-4 text-slate-800 dark:text-slate-200">Initialize the LiveKit API client</div>

```python theme={null}
from livekit import api as livekit_api

lk = livekit_api.LiveKitAPI(
    url="YOUR_LIVEKIT_URL",
    api_key="YOUR_LIVEKIT_API_KEY",
    api_secret="YOUR_LIVEKIT_API_SECRET"
)
```

<div className="text-xl font-bold mt-8 mb-4 text-slate-800 dark:text-slate-200">Create an outbound trunk</div>

Connect LiveKit to your Vobiz SIP trunk using the credentials from Part 1:

```python theme={null}
trunk = await lk.sip.create_sip_outbound_trunk(
    livekit_api.CreateSIPOutboundTrunkRequest(
        trunk=livekit_api.SIPOutboundTrunkInfo(
            name="Vobiz Trunk",
            address="YOUR_VOBIZ_SIP_DOMAIN",       # sip_domain from Vobiz
            auth_username="YOUR_VOBIZ_USERNAME",   # username from Vobiz
            auth_password="YOUR_VOBIZ_PASSWORD",   # password from Vobiz
            numbers=["YOUR_PHONE_NUMBER"],         # your Vobiz phone number
        )
    )
)

# Save trunk.sip_trunk_id - you'll need it to make calls
```

<Check>
  Your LiveKit project is now securely linked to the Vobiz network.
</Check>

Field mapping from Vobiz → LiveKit:

| Vobiz field       | LiveKit field     |
| ----------------- | ----------------- |
| `sip_domain`      | `address`         |
| `username`        | `auth_username`   |
| `password`        | `auth_password`   |
| Your phone number | `numbers` (array) |

## Part 4: Make outbound calls

```python theme={null}
participant = await lk.sip.create_sip_participant(
    livekit_api.CreateSIPParticipantRequest(
        sip_trunk_id="YOUR_TRUNK_ID",   # from Part 3
        sip_call_to="+1234567890",      # number to call (E.164)
        room_name="call-room",          # LiveKit room name
    )
)
```

Call flow:

1. LiveKit creates the call via Vobiz
2. The person answers and joins the LiveKit room as a participant
3. Your AI agent joins the same room
4. The conversation begins

## Part 5: Configure inbound calling

<Note>
  For a complete working example, see the [LiveKit Vobiz Inbound Repository](https://github.com/vobiz-ai/Livekit-vobiz-inbound).
</Note>

1. In the <a href="https://cloud.livekit.io" className="text-primary font-medium hover:underline">LiveKit Cloud Dashboard</a>, go to **Settings > Project** and find the **SIP URI** field.

   ```text theme={null}
   sip:your-sip-uri.sip.livekit.cloud
   ```

2. Update your Vobiz trunk to route inbound calls to LiveKit. See [Update Trunk](/trunks).

   <Warning>
     Remove the `sip:` prefix when entering the destination in Vobiz. LiveKit shows `sip:your-sip-uri.sip.livekit.cloud` but you enter `your-sip-uri.sip.livekit.cloud`.
   </Warning>

   ```bash theme={null}
   PATCH https://api.vobiz.ai/api/v1/Account/{auth_id}/trunks/{trunk_id}
   ```

   ```json theme={null}
   {
     "inbound_destination": "your-sip-uri.sip.livekit.cloud"
   }
   ```

3. In the LiveKit dashboard, go to **Telephony > Trunks** and click **Create new trunk > Inbound**. Configure:

   * **Phone Numbers:** Your Vobiz number (for example, `+918071387434`)
   * **Allowed Addresses:** `0.0.0.0/0` (restrict this in production)

   Click **Create** and save the **Trunk ID**.

4. Go to **Telephony > Dispatch Rules** and click **Create new dispatch rule**. Configure:

   * **Rule Type:** Individual
   * **Room Prefix:** `call-`
   * **Match Trunks:** Select your inbound trunk

   Expand the **Agent dispatch** section and set **Agent Name** to `voice-assistant` (must match your agent exactly). Click **Create**.

## Part 6: SIP call transfer

The LiveKit Voice Agent supports cold transfer via SIP REFER.

* Say **"Transfer me"** or **"Transfer me to a live agent"** → transfers to the default configured number
* Say **"Transfer me to +1 555 000 1234"** → transfers to the requested number

The agent constructs the SIP URI (`sip:+15550001234@<your-sip-domain>`) and initiates the transfer automatically.

<div className="text-xl font-bold mt-8 mb-4 text-slate-800 dark:text-slate-200">Transfer troubleshooting</div>

| Error                         | Cause                                  | Solution                                                                                  |
| ----------------------------- | -------------------------------------- | ----------------------------------------------------------------------------------------- |
| Status 500 (Max Auth Retry)   | Incorrect SIP credentials              | Run `python setup_trunk.py` again to update credentials                                   |
| Status 408 (Timeout)          | Invalid SIP URI or blocked             | Ensure `VOBIZ_SIP_DOMAIN` is set in `.env`. Verify "Call Transfer (SIP REFER)" is enabled |
| Status 400 (Invalid argument) | Destination is not a URI               | Update code - `sip:` prefix and `@domain` are now added automatically                     |
| Disconnects but no ring       | Transfer succeeded, destination failed | Check the destination number or SIP provider logs                                         |

## Troubleshooting

<div className="text-xl font-bold mt-8 mb-4 text-slate-800 dark:text-slate-200">Outbound calls</div>

**Call doesn't connect:**

* Verify `address` in the LiveKit trunk matches your exact Vobiz `sip_domain`
* Check that credentials (`auth_username`, `auth_password`) match exactly
* Common mistake: using `sip.vobiz.ai` instead of your specific domain

**SIP 401 Unauthorized:**

* Verify credentials in [Vobiz Console](https://console.vobiz.ai) under Trunks
* Ensure the LiveKit trunk uses the same credentials

**Insufficient balance:**

* Check your balance at [Vobiz Console](https://console.vobiz.ai) and top up if needed

<div className="text-xl font-bold mt-8 mb-4 text-slate-800 dark:text-slate-200">Inbound calls</div>

**Call disconnects immediately:**

* Confirm `inbound_destination` has the `sip:` prefix removed
* Verify your Vobiz phone number is added to the LiveKit inbound trunk
* Check that `allowed_addresses` is set to `0.0.0.0/0` in the LiveKit trunk

**Agent doesn't answer:**

* Confirm the agent is running
* Verify the dispatch rule has "Agent dispatch" configured
* Check that the agent name matches exactly (for example, `voice-assistant`)
* Confirm the dispatch rule is linked to the correct inbound trunk

## Quick reference

<div className="text-xl font-bold mt-8 mb-4 text-slate-800 dark:text-slate-200">Credentials mapping</div>

| Credential         | Where to get         | Used for                      |
| ------------------ | -------------------- | ----------------------------- |
| Vobiz `sip_domain` | Vobiz trunk response | LiveKit trunk `address`       |
| Vobiz `username`   | Vobiz trunk response | LiveKit trunk `auth_username` |
| Vobiz `password`   | Vobiz trunk response | LiveKit trunk `auth_password` |
| Vobiz phone number | Vobiz Numbers API    | LiveKit trunk `numbers`       |
| LiveKit SIP URI    | LiveKit Settings     | Vobiz `inbound_destination`   |
| LiveKit trunk ID   | After creating trunk | Making calls                  |

<div className="text-xl font-bold mt-8 mb-4 text-slate-800 dark:text-slate-200">Common errors</div>

| Error                | Cause                       | Fix                                   |
| -------------------- | --------------------------- | ------------------------------------- |
| 401 Unauthorized     | Credentials mismatch        | Verify Vobiz username/password        |
| Call fails silently  | Wrong address               | Use exact Vobiz `sip_domain`          |
| Insufficient balance | Low credits                 | Add funds in Vobiz Console            |
| Inbound disconnects  | Wrong `inbound_destination` | Remove `sip:` prefix                  |
| Agent doesn't join   | Missing agent dispatch      | Configure agent name in dispatch rule |

## Resources

**Vobiz**

* [SIP Trunks](/trunks)
* [Phone Numbers](/account-phone-number/list-account-phone-numbers)
* [Balance & Billing](/account/balance)
* [Console](https://console.vobiz.ai)

**LiveKit**

* [LiveKit Agents](https://docs.livekit.io/agents)
* [SIP Integration](https://docs.livekit.io/sip)
* [Python SDK](https://docs.livekit.io/client-sdk-python)

**Example repositories**

* [Inbound starter](https://github.com/vobiz-ai/Livekit-vobiz-inbound)
* [Outbound & transfer starter](https://github.com/vobiz-ai/LiveKit-Vobiz-Outbound)

**Support**

* Vobiz: [support@vobiz.ai](mailto:support@vobiz.ai)
* LiveKit: [livekit.io/support](https://livekit.io/support)

<Check>
  **Integration complete!**

  Your LiveKit agents can now make and receive calls through Vobiz.
</Check>
